Just this last August, my nephew started his first day of Kindergarten. Of course we had to send him off with pizzazz so we planned a small going away party ahead of his first day of school.
We wanted to keep things simple, just one display in the kitchen, a gift and some snacks. I had been wanting to try my hand at making some balloon pencils I’d seen online and this was the perfect opportunity.

I decided to make 2 pencils. I created these with the cheaper balloons used by balloon artists since I expected some trial and error.
For these balloon columns I used lamp stands, PartyWoo balloons and a balloon sizing box. As pictured, I made 3 layers of pink balloons, 1 of silver, 7 of yellow, 2 of tan, and and 3 of black.
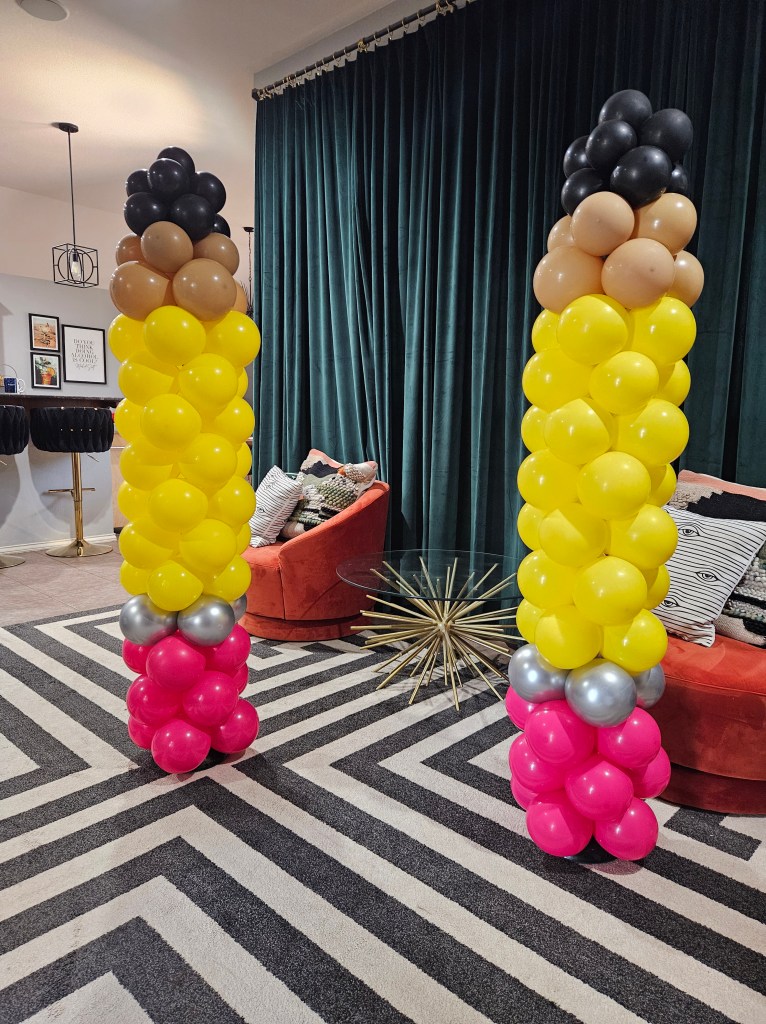
To create a layer of any given color, I blew up 2 balloons in that color, then sized down and tied together. I repeated this again, then twisted the 2 sets of 2 together to make a quad (4 balloons). Once I had a quad I would place the balloons onto the column and twist 2 to lock it into the column. The pink, silver, yellow, and first tan layers were all sized to 8″. The second tan layer was sized to 7″, the first black layer sized to 6″, the second and third black layers were sized to 5″. To create the point, I tied a stand-alone 5th balloon into the last quad of black balloons, and when I wrapped it onto the lamp stand, I just twisted the 5th black balloon up into the top, instead of around with the others.
I did a practice pencil before the party, then rinsed and repeated twice before the event. I pre-made these at home and they fit easily in a regular sized vehicle for transporting.
Ingredients to a ‘Back to School’ Pencil Column
As an Amazon Associate I earn from qualifying purchases
- Lamp Stand (cut off shade and wires)
- Balloon Sizer Box
- Balloon Inflator
- Hot Pink PartyWoo Balloons
- Silver PartyWoo Balloons
- Yellow PartyWoo Balloons
- Tan PartyWoo Balloons
- Black ParyWoo Balloons
I transported the pencils to the venue and started the on-site setup, which included placing the columns to the left and right of the kitchen table, and getting started on a primary color balloon arch above the table.
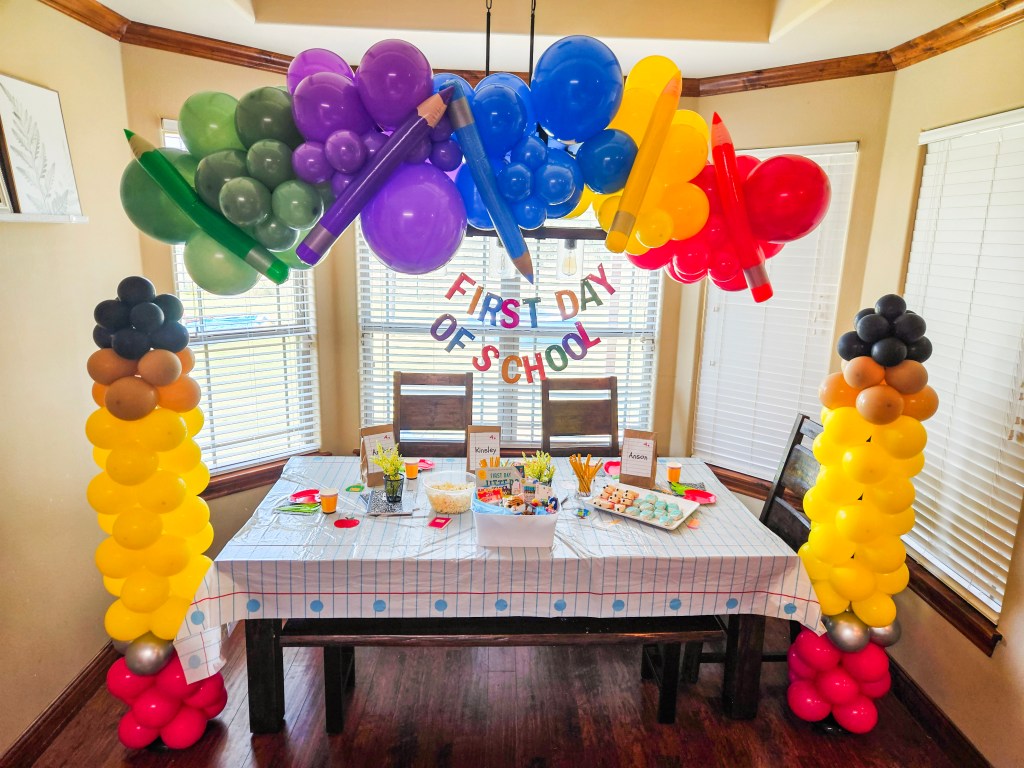
I created the balloon display using green, purple, blue, yellow and red. I made just one “cluster” of each color using a formula of 1 17″ balloon and 7 11″ balloons. To create these clusters you will need to blow up 1 17″ and 1 11″, blow them bigger than you need then push down on the table so air lets out and it rounds out the balloons. Tie them together and then repeat with 3 sets of 11″ then twist them all together. Repeat with each of the colors listed, then attach the colors into a row using 260‘s tied end to end to make a circle. Wrap that around 2-3 balloons from each color cluster so the colors sit side by side.
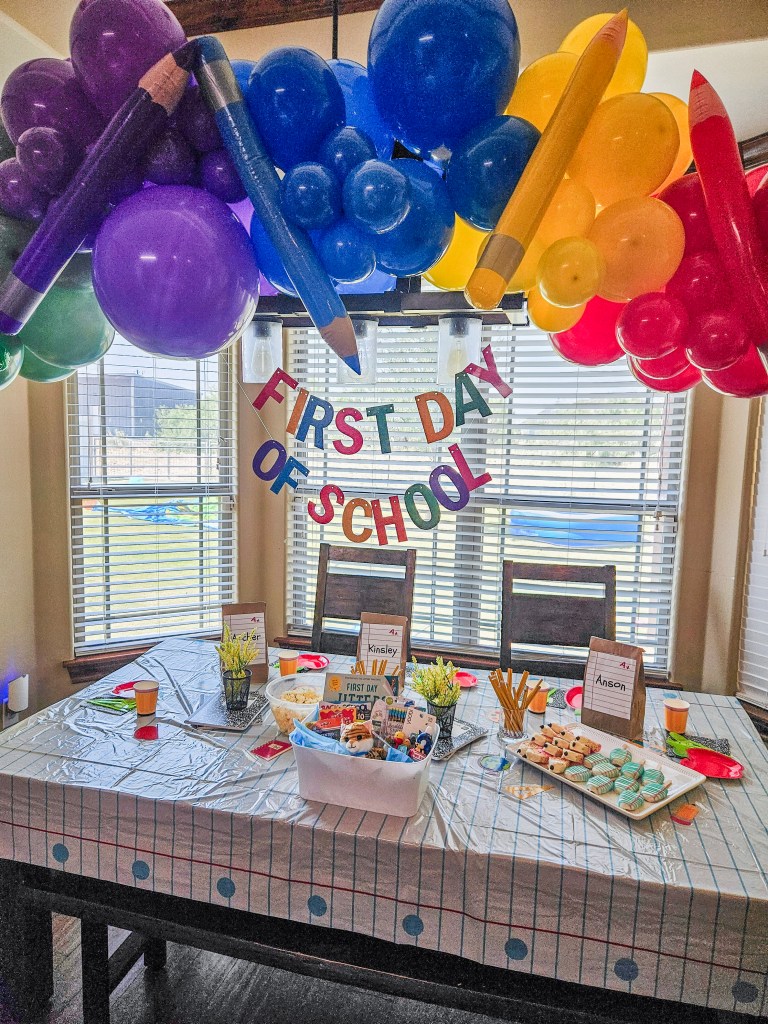
I then used the same 260 balloon tie method to secure the balloon arch onto the kitchen chandelier above the table. This will make it easy to identify gaps that need filling with 5″ balloon clusters. To create these clusters I used a hand pump to blow up 5″ balloons, then rounded out the same way as the larger balloons by pressing into the table and letting out air. Tie 2 balloons together twice, and twist the pairs into a quad. I then use the 260 tie around 1 of the balloons and then slip it over one of the larger balloons in the arch and adjust as needed to cover the gaps.
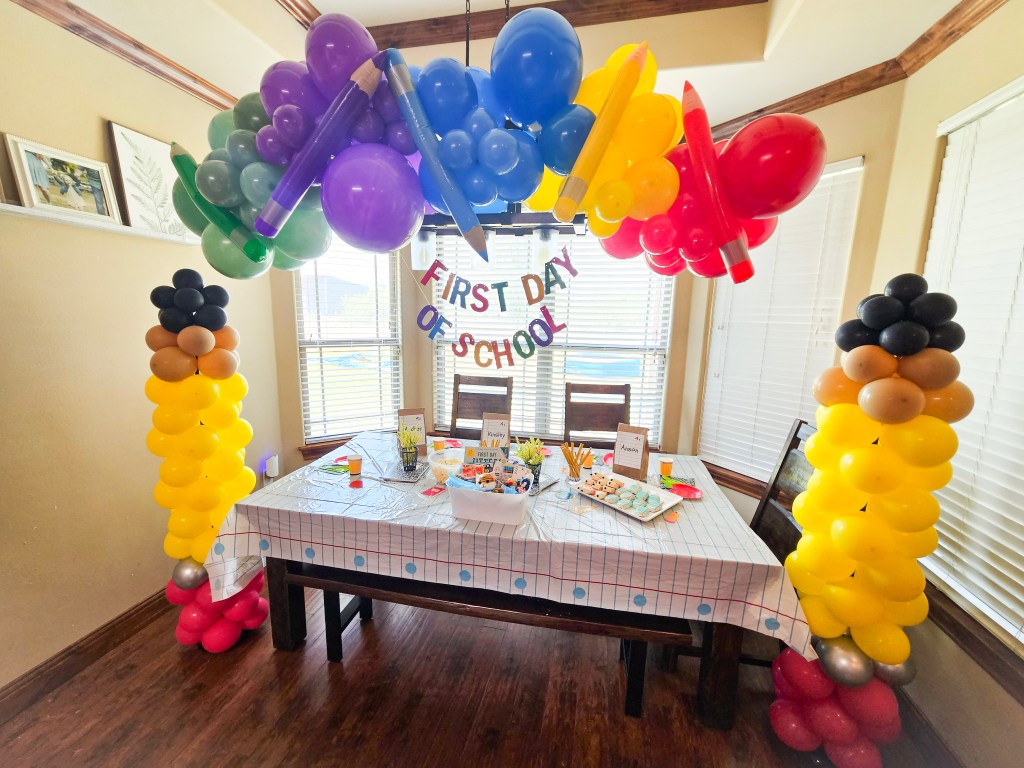
To finish off the balloon arch I inflated pencils in the same colors as the balloon clusters. These pencils had 2 spots each with a tag with a home through which I tied a 260, then tied the 260 end to end and wrapped around a balloon in the matching color cluster.
The final touch of the floating decor was a multi-color “First Day of School” banner. I used fishing line instead of the ribbon that comes with the banner to string it up so it appeared to float more invisibly and gave more length to tie up to the chandelier under the arch and cut the excess fishing line.
Ingredients to a ‘Back to School’ Balloon Arch
As an Amazon Associate I earn from qualifying purchases
- 260 Balloons
- Manual Balloon Pump
- Green PartyWoo Balloons
- Purple PartyWoo Balloons
- Blue PartyWoo Balloons
- Yellow PartyWoo Balloons
- Red PartyWoo Balloons
- Inflatable Colored Pencils
- Back to School Banner
- Fishing Line
- Scissors
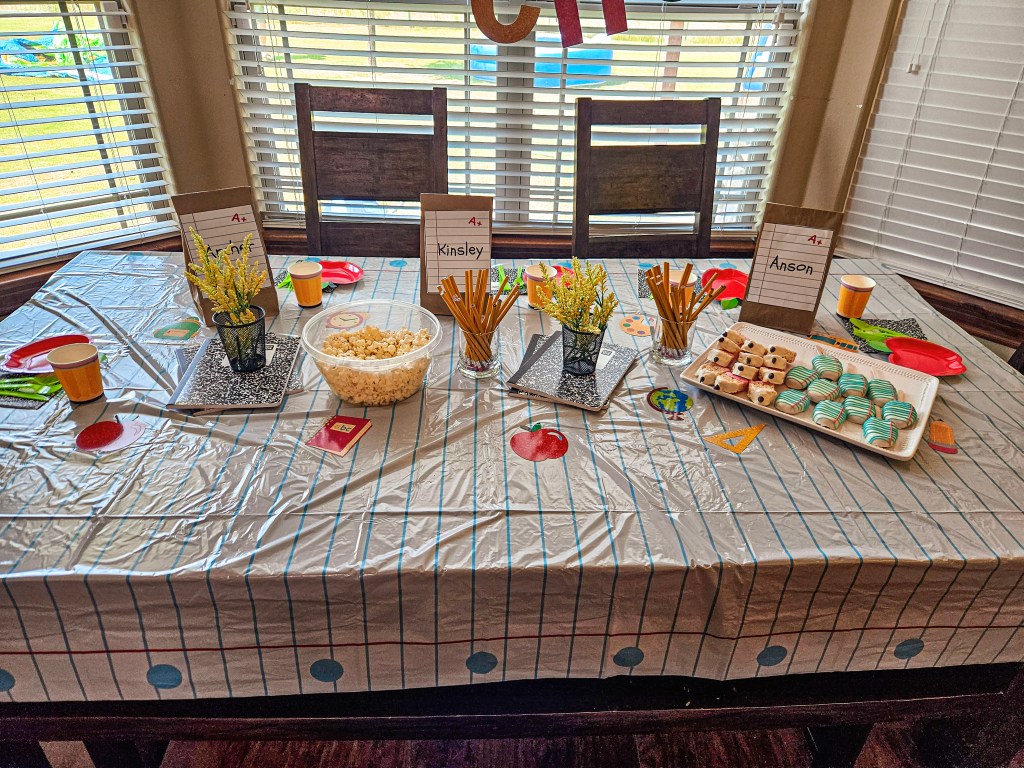
For the table itself, I ordered a kit that included a notebook paper-style plastic tablecloth, apple shaped plates, pencil style cups, and composition notebook printed napkins. I also used the fruit and school supply cutouts that came with the “Back to School Banner” as additional pieces of decor on the table instead of stringing them for hanging decor.

For additional decor, I took 2 composition notebooks and stacked them, making both visible. On top of those I placed a pencil cup filled with yellow florals. I created 2 of these for the table.

I also created made a simple shallow glass vase filled with pencils as another piece of decor. I setup 2 of these as well.
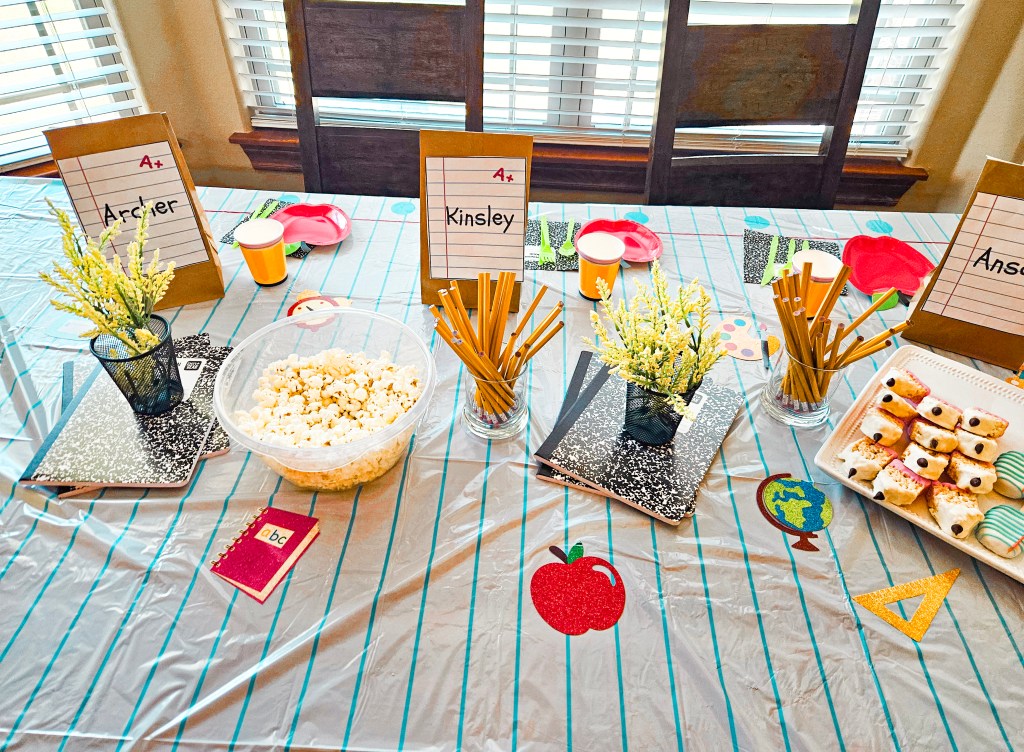
Lastly for decor we setout brown bags with with take-home snacks and printed names of the sweet cousins all attending the party.
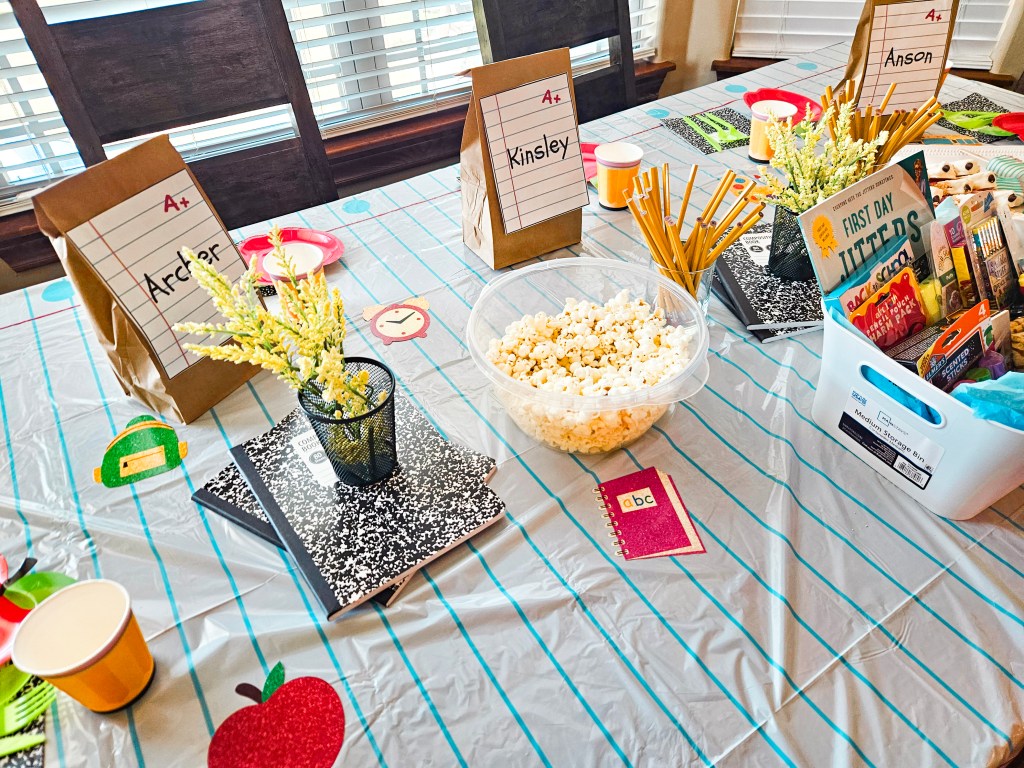
This party was not around any major meals, so we were able to keep food simple with just snacks like popcorn and incredible themed sweet treats made by our favorite cookie artist and co-host Caseyjo_Cookies.

We presented our particular pre-school graduate with a small gift basket with back-to-school essentials and special prizes.

Ingredients to a ‘Back to School’ Table
As an Amazon Associate I earn from qualifying purchases
- School Decoration Kit
- 4 Composition Notebooks
- 2 Pencil Cups
- Yellow Florals
- 2 Shallow Glass Vases
- Pencils
- Brown Bags
- Glue Sticks
- Notebook Name Printables
- Kids Snacks and Prizes of Choice for Goodie Bags
- Snacks of Choice for Party
- Themed Treats from your Favorite Local Cookie Artist
Parties like this can be simple, quick to setup, and a fun and special way to celebrate milestones in your family or friend group.
I hope this post inspires the whimsy in your own opportunities for celebration. Welcome Back to School Folks!

Leave a comment