It’s hard to “bee”lieve that the little baby I threw this shower for is almost 2 years old now!
A sweet friend who used to be one of the teens in my youth group let me in on the fantastic news that she and her husband were expecting a baby girl. As we got closer to her due date I knew I needed to be the one to throw her a shower and make sure she felt completely special and spoiled.
I loved flying solo on this shower and having full creative control. I had the honoree choose her shower theme and started looking for inspirational photos. I covered the full venue, setup, decor, games, and desserts but asked her grandma, who was looking for a way to contribute, to bring the main food items as that is my least favorite part of planning and not my strength at all.
My original venue was the lobby of the church that Alicia, the expecting mother, and I used to attend where she belonged to the youth group I helped lead. The lobby was big and had gorgeous floor to ceiling windows. It was very spacious and a beautiful canvas for the shower. Unfortunately the day of the shower, the lobby AC unit broke down in the Texas heat.
The church found an alternative, a Sunday School classroom that was on a different unit and was cool enough to host in. The room was quite small, but I had no choice but to pivot and make the space work for the planned shower- after all, it was the same address as the invitation and guests would be arriving in only a few hours!
With a new canvas to decorate within, I started brainstorming how to setup tables and make the most use of the small space. I finally figured out the best flow for the layout of the room and started decorating the entrance so guests would know where to navigate in the sea of classroom doors.
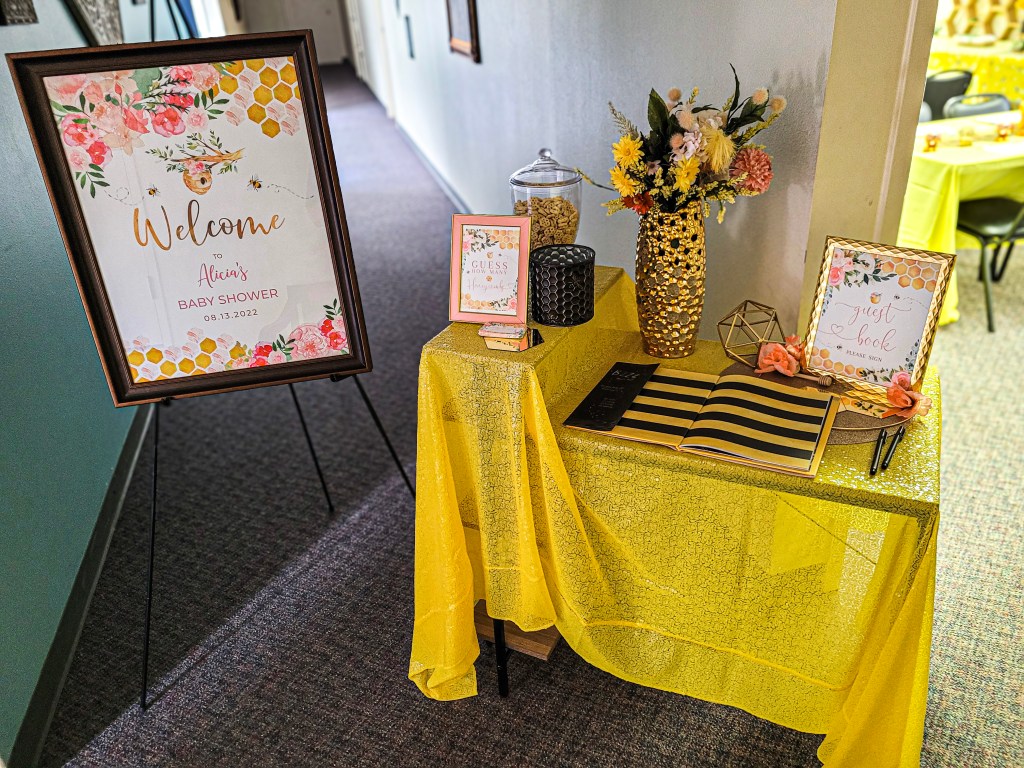
For the entry I had printed a large print that I downloaded from Etsy and printed with Fedex. I added a large frame and purchased a stand for the frame. I used this to block the hallway some too so folks would funnel into the correct room and not wander.
I borrowed a table from the lobby of the church and added a sequin yellow tablecloth that I have re-used many times since. I used the same Etsy store for all my pintables- including the “Guess the Honeycomb” game and the Guest Book sign.
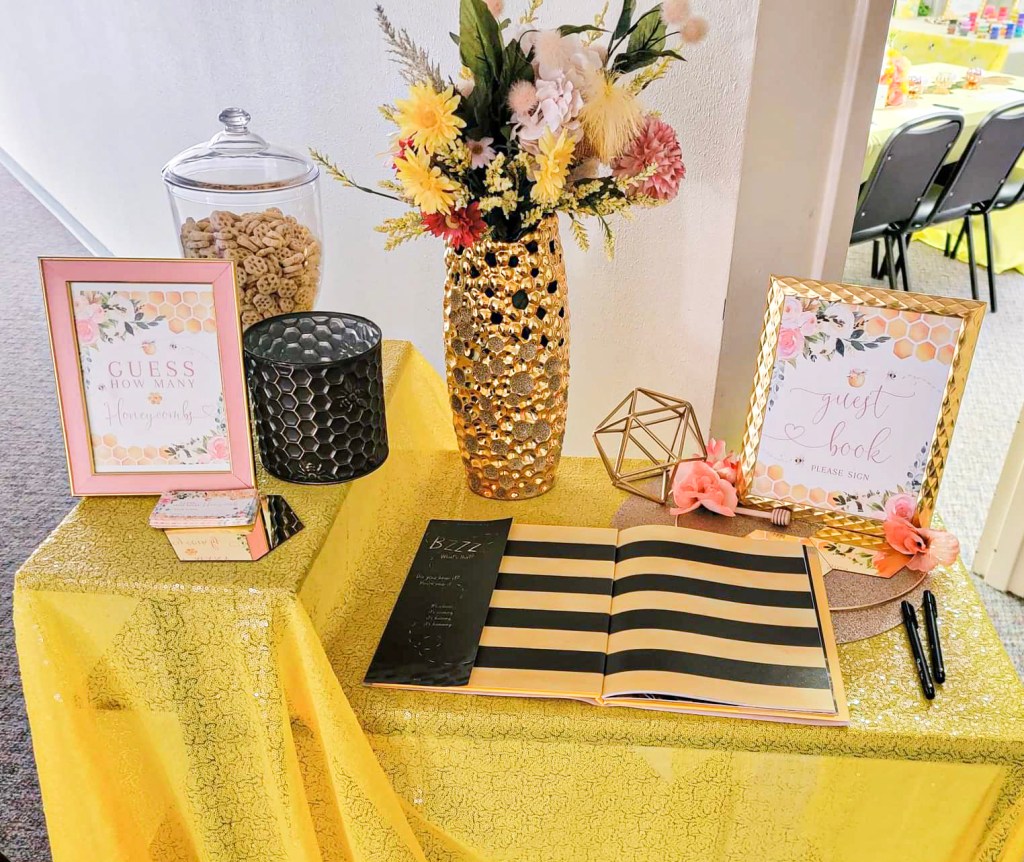
I used honeycomb cereal for the honeycomb game and had a prize set aside for the winner. I found a cute bee book for the guest book and opened it the the cover page for signing. The vase was one I had wanted to purchase for my home anyway- so I used it for the party and re-purposed it after. I filled it with flowers from Hobby Lobby and added some decorative touches to make the table as fun as possible!
“Ingredients” for a ‘Sweet as Can Bee’ Entry Table
As an Amazon Associate I earn from qualifying purchases
- Welcome Sign from Etsy (Printed with Fedex)
- Photo Frame for Welcome Sign
- Frame Holder for Welcome Sign
- Yellow Sequin Tablecloth
- Clear Cannister for Honeycomb Cereal
- Honeycomb Cereal (Count as You Fill)
- “Guess How Many Honeycombs” Etsy Printable (Printed with Fedex)
- Pink Standing Frame for Printable
- Honeycomb Mirror Panels
- Honeycomb Cannister for Guess Answer Cards
- Honeycomb Vase
- Flowers of Choice from Hobby Lobby or Store of Choice
- Gold Honeycomb Decor
- Rose Gold Glitter Placemat
- Gold Ring
- Guest Book Etsy Printable (Printed with Fedex)
- Gold Standing Frame for Printable
- Bee Story Book (Used as Guest Book)
- Pens
With the entryway completed I moved inside and worked my way from the back of the room toward the front door. I assumed the more time-consuming tasks would be hanging the big grass wall, arch, and backdrop, so I wanted to complete those items first and work on the small details later.
I placed the gift table in the corner where I put some signage indicating that this was the gift-drop area, placed the hostess gifts, and added a diaper raffle (our mother-to-be requested only cloth diapers so this was my effort to get her a big stash!) I chose a pink tablecloth for this table to help breakup all the yellow, tie in the centerpieces, and highlight that we were celebrating a baby girl! I found the gorgeous printouts on Etsy and got everything printed with Fedex.

Next I would work on the area where the expecting mother would open her gifts. I placed it right next to the gift table for ease of use and started hanging the grass wall up with push pins.
Once the grass wall was up, I assembled a large round gold arch on which I adorned yellow silky fabric and pink tulle to tie in all the colors. I zip-tied some Flora Foam where I was looking to secure the draped fabric, and used that to tie up the fabric in two places (pictured below) and added pink and yellow flowers into the flora foam.

I tied a “Soon to Bee a Family of Three” banner onto the arch, and learned a valuable lesson: don’t use a black letter banner in front of a grass wall. It was too late to make a change, and it could be read up close, but in the future I would choose a different color banner to stand out from the grass wall.
Finishing touches were a chair-of-honor, pillow, and “BABY” boxes stacked to the right. This gift-opening area was ready and looking super cute!!
“Ingredients” for a ‘Sweet as Can Bee’ Gift Area
As an Amazon Associate I earn from qualifying purchases
- Round Pink Tablecloth
- “Gift and Cards” Etsy Printable (Printed with Fedex)
- Gold Standing Frame for Printable
- Rose Gold Placemat
- Gold Ring
- “Diaper Raffle” Etsy Printable (Printed with Fedex)
- Pink Standing Frame for Printable
- “Diaper Raffle” Set (Box and Cards) Pre-Printed
- Pink Pen
- Grass Wall
- Gold Circle Arch
- “Soon to Bee a Family of Three” Banner
- Yellow Fabric
- Pink Tulle
- Flora Foam
- Zip Ties
- Pink and Yellow Flowers of Choice from Hobby Lobby or Store of Choice
- Yellow Chair
- “BABY” Blocks
The next big area to create was the food table. I combined the food and game tables together because we had plenty of room for all of it with 2 tables side by side. I added a large fabric backdrop here to cover a large surface area of wall space and highlight our theme. In most places (gift and guest tables) I prefer to use real fabric tablecloths so I can save them for future events and re-use, but for the food table I chose plastic disposable tablecloths that were absolutely precious and added a necessary pop of pattern and color into the mix.
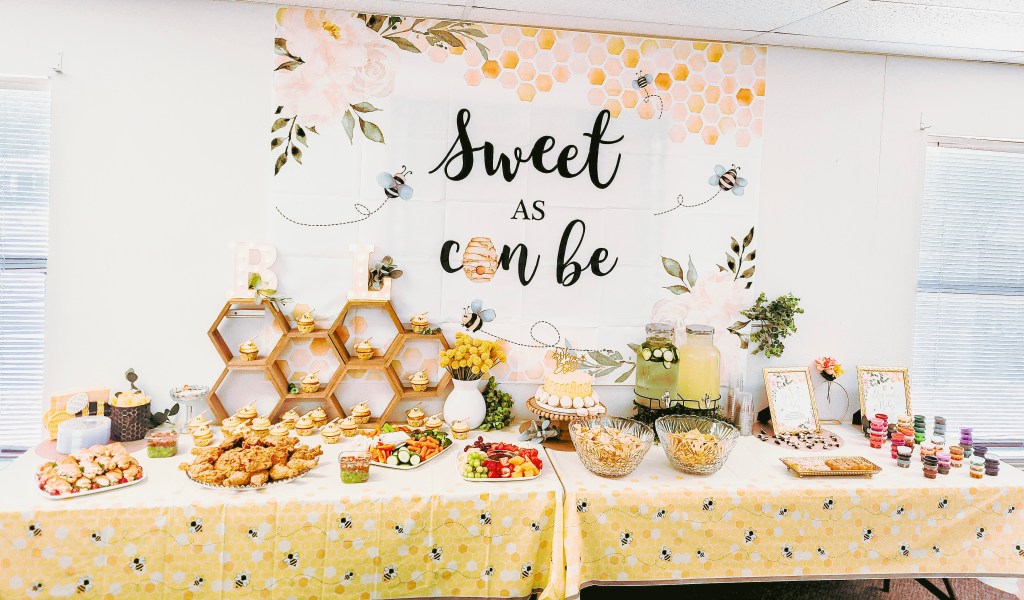
All the food was placed off to the left along with plates, utensils and napkins. In the center I placed the cake and on the right was drinks and games (and a couple more snacks). I also added themed decor throughout the table to fill in blank spaces and keep things interesting!
One of the highlights of this food table was the cupcake display. I made the cupcakes myself and kept it simple (I’m no baker). I made boxed cupcakes, bee cupcake liners, and used a large circle frosting tip to create a “honeycomb” icing pattern and added a sugar-bee and honeycomb wand on top. I purchased 2 wood honeycomb displays and filled the displays with the bee cupcakes. I also added a “B” and “L” small marquee to the top of the display (the initials of the sweet baby we were celebrating).

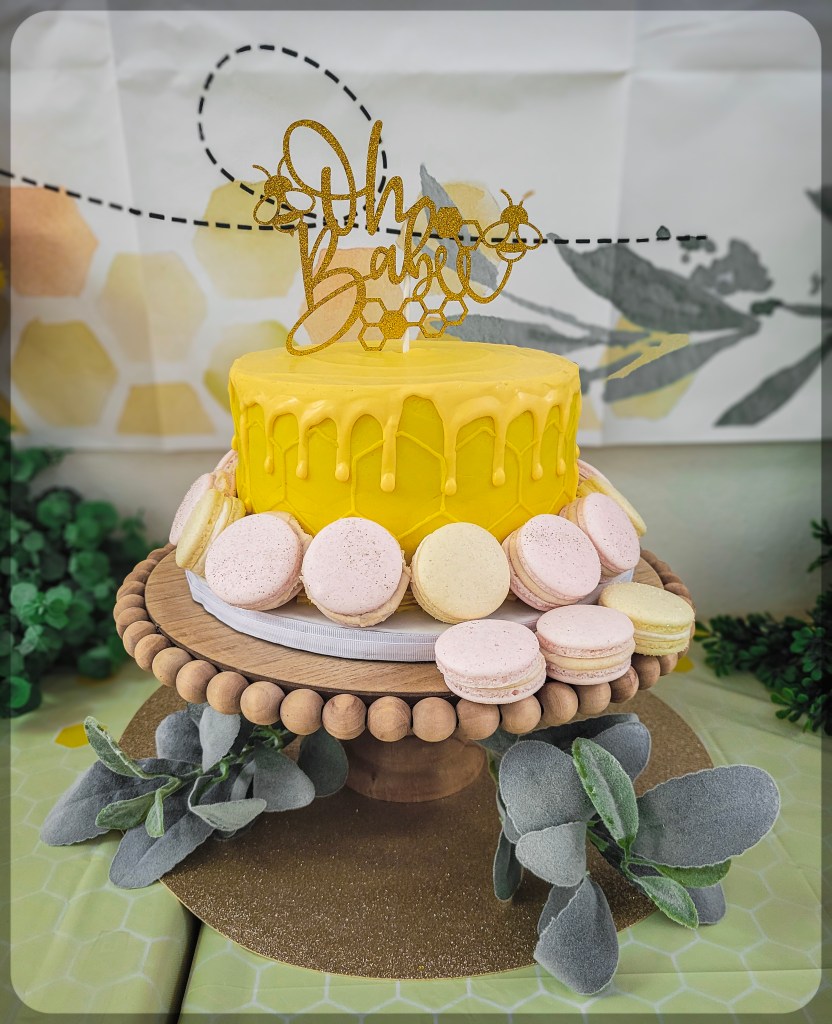
Next lets make our way to the right of the table where the cake is displayed! I used a tall cake display because I had chosen a 1 tier small cake and still wanted it to stand out. I worked with a custom cake company to create a vision that I had in my head (because I had tried to make it myself and failed MISERABLY). I wanted a honeycomb patter on the cake itself, but I also wanted an icing drip at the top to be a “honey” effect. It turned out exactly how I wanted! I added a cake topper and some locally made pink and yellow macron cookies to create a beautiful visual dessert centerpiece.
Continuing our journey to the right of the food table is the drinks and and games. I chose 2 games that were self-paced: “Don’t Say Baby” and “Let’s Make a Baby”. We are all familiar with the first, everyone gets a pin (I chose bee pins) and if they say the word “baby” whoever caught them gets to take their pin. The person with the most pins at the end of the event wins a prize. The latter is a game I hadn’t encountered yet, the attendees make babies out of playdough and there is a vote for the favorite, which wins a prize. Unfortunately no one participated in this game; I wouldn’t call it a dud yet, because I hope that some other group out there really enjoys it!

I also featured some “raw honeycomb” on the tray in this area. I thought it would be a fun experimental snack for the theme, and I’d always wanted to try it! It wasn’t a huge hit, but I’m still glad I did it! Last note, as you can see, I sprinkled foliage throughout this table as it made sense to, which really tied things together and added to the look!
“Ingredients” for a ‘Sweet as Can Bee’ Food Table
As an Amazon Associate I earn from qualifying purchases
- “Sweet as Can Bee” Backdrop
- Tablecloths
- Bee Napkin Holder
- Cannister (for plastic utensils)
- Yellow Napkins
- Clear Plates
- Cupcake Displays
- Cupcakes
- Boxed Cupcake Mix of Choice
- Yellow Frosting (or White w/ Yellow Food Coloring)
- Bee Cupcake Liners
- Wide Circle Frosting Tip
- Frosting Bags
- Sugar Bees
- Honeycomb Wands
- Rose Gold Placemats
- Initial Letter Marquees
- White Vase
- Yellow Seed Flowers
- Foliage
- Cake Stand
- Custom Cake from Local Bakery
- Cake Topper
- Macron Cookies
- Finger Foods of Choice
- Drink Dispenser Set
- Clear Cups
- Etsy “Don’t Say Baby” Printable (Printed with Fedex)
- Gold Standing Photo Frame
- Bee Pins
- Vase
- Pink and Yellow Flowers of Choice from Hobby Lobby or Store of Choice
- “Let’s Make a Baby” Etsy Printable (Printed with Fedex)
- Playdough Set
- Raw Honeycomb Squares
- Lemonade
- Water with Cucumber Slices
- Plenty of Ice
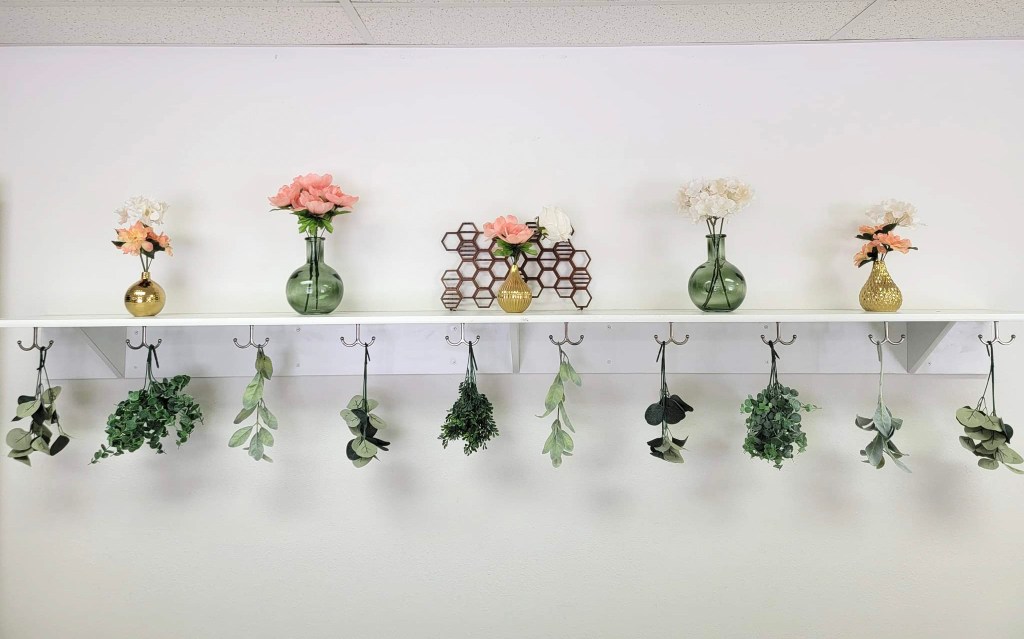
Before starting on the detail work of the guest tables (of which I had 3) I had an odd wall that I wasn’t expecting to need to decorate prior to the change in location, so I came up with a plan to make it pretty!
The wall to the left had a shelf and hooks. Thankfully I’d packed some vases and foliage that I didn’t have another use for. I had also purchased a honeycomb jewelry display that I knew I’d want to use as a decoration somewhere. I hung various styles of foliage upside down on the hooks and setup the vases with flowers and the honeycomb jewelry display on the empty shelf. It made for such a pretty little backdrop and during the party (as we ran out of seating) we ended up moving a pew under this shelf for additional seating, which made for a cute seating area.
“Ingredients” for a ‘Sweet as Can Bee’ Accent Wall
As an Amazon Associate I earn from qualifying purchases
- Gold Vase Set
- Green Vase Set
- Honeycomb Jewelry Display
- Pink, Yellow, and White Flowers of Choice from Hobby Lobby or Store of Choice
- Varying Foliage
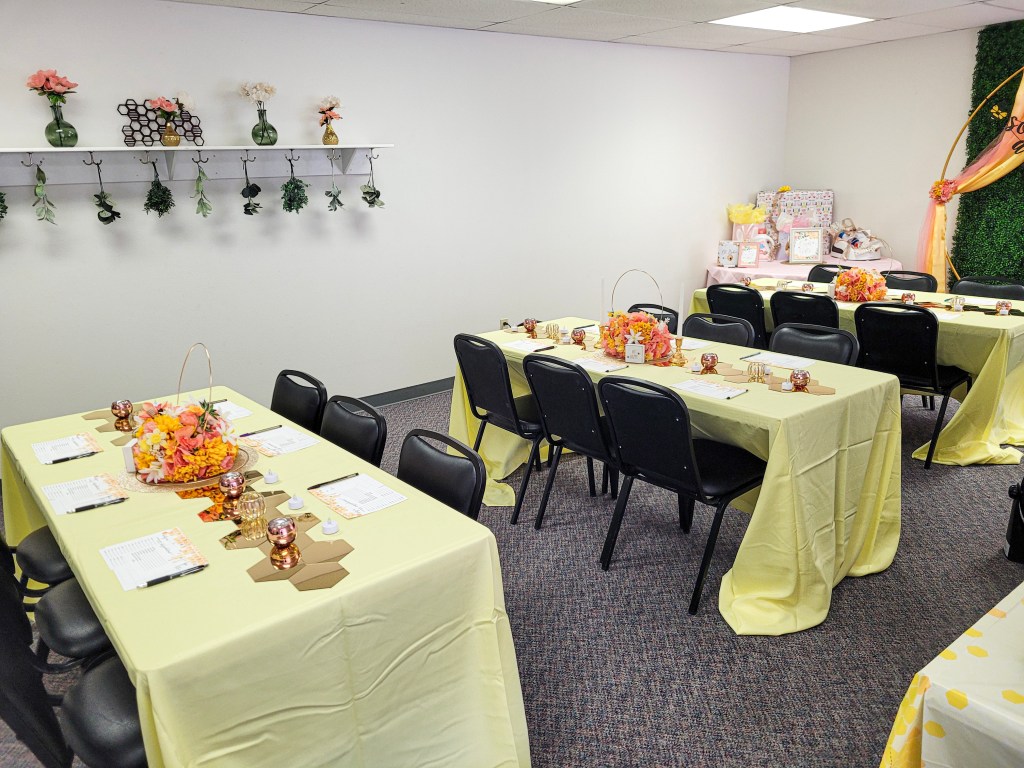
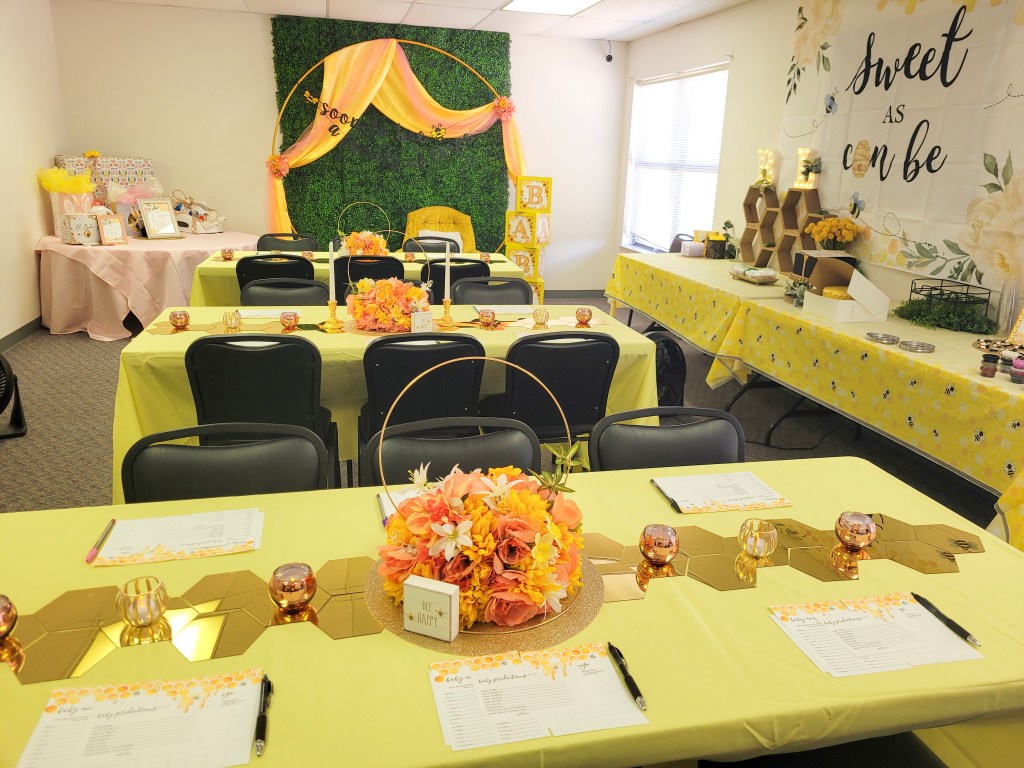
Finally it was time to work on the three guest tables. This I was prepared for; I had setup a test table at my own house and laid out exactly how I wanted it to look. I had pre-made the centerpieces and taken a picture so I could recreate the look at the shower.
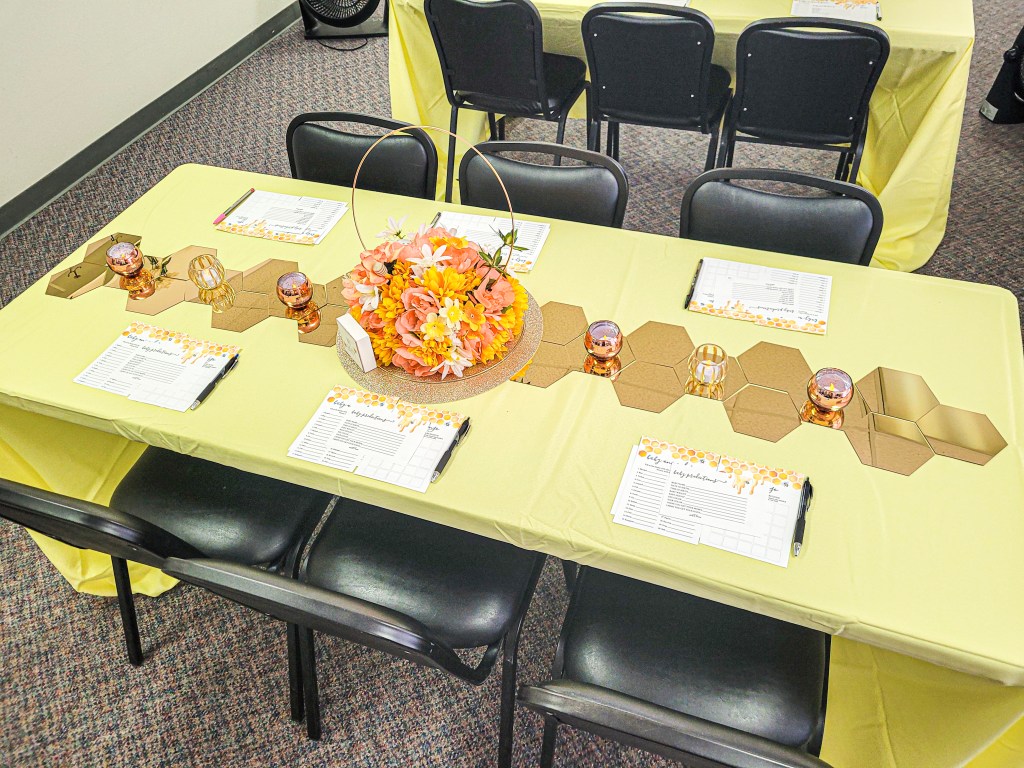
I started with yellow fabric tablecloths on each table then added the centerpieces. I made these by taking a square piece of Flora Foam, inserting round gold hoops into the middle, then covering the foam completely with pink, yellow, and white flowers from Hobby Lobby. The final touch was adding a honeycomb wand on each side of the centerpiece.
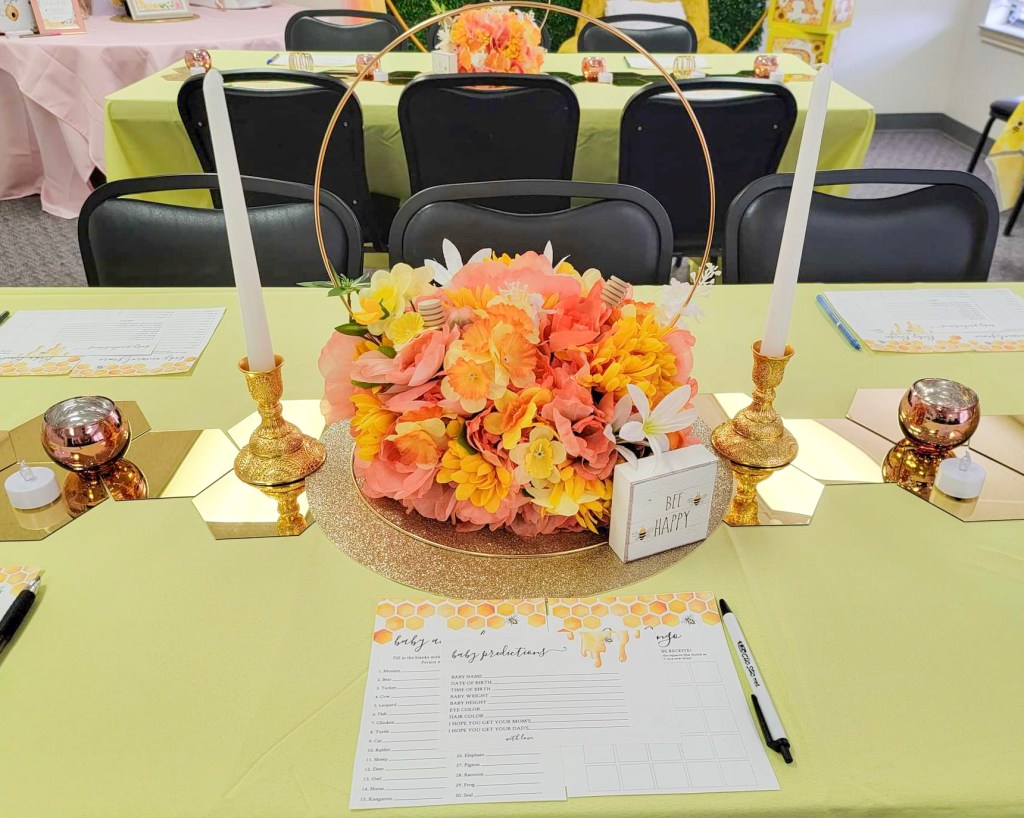
I placed rose gold glitter placemats in the center of the table, then a round gold ring, then set the centerpieces inside the rings. I added a “Bee Happy” wooden quote plaque on each side of the centerpiece and on the middle table only, I added gold candlestick holders and candlesticks to either side of the centerpiece.
Next I placed gold honeycomb mirror panels all along the middle of the tables. I added pink and clear votive holders on top of the panels and filled them with battery powered tealight candles.
The final touch to these tables was the final printed games in each spot and writing utensils for them. The games I chose were “Baby Animals”, “Baby Predictions”, and “Baby Bingo”.
After placing these games at each chair- this was the final result of the tables:
I was very happy with the final result and so was my mother-to-be. The shower ended up packed solid and if we were in the original location then we would have certainly needed two more tables!
“Ingredients” for a ‘Sweet as Can Bee’ Guest Tables
As an Amazon Associate I earn from qualifying purchases
- Yellow Fabric Tablecloths
- Rose Gold Glitter Placemats
- Gold Rings
- Gold Candlesticks Holders
- Candlesticks
- Honeycomb Wands
- Flora Foam
- Your Choice of Pink, Yellow, and White Flowers from Hobby Lobby or Your Store of Choice
- “Bee Happy” Wooden Plaques
- Gold Honeycomb Mirror Panels
- Clear and Gold Votive Holders
- Pink Votive Holders
- Battery Powered Tealight Candles
- “Baby Animals” Etsy Printable (Printed with Fedex)
- “Baby Predictions” Etsy Printable (Printed with Fedex)
- “Baby Bingo” Etsy Printable (Printed with Fedex)
- Pens
Last was the prizes. I went to the dollar store and found random items that were legitimately cute and made good prizes (example: I put together a bag with flower seeds, a pot and a water can). I had chosen 6 total games that could have prizes, so I came up with 6 cute prizes (some bigger than others) and stored them on an empty shelf on the backside of the room.
During the party we played the games, ate, opened presents, and gave out the prizes to very excited winners. The shower was a huge hit, I got a ton of compliments on the decor and Alicia left feeling loved and blessed (that’s the whole big picture!)
I hope this inspires your own planning for your bee themed baby shower!
Thanks for Buzzing By!!

Leave a comment